
 How Facebook Groups Can Boost Your Sales
Facebook has an amazing community with over 2 billion active users a month, and over half of these users are active in what’s called a Facebook Group. These groups are pages created for a business or organization for promotion of activities.
Users can join the group and contribute their posts onto a wall and interact through discussion threads. Groups are a super valuable target because a lot of them are closed or private so there is more engagement likely to happen.
Building a targeted Facebook Group can help you market more sales and obtain more prospects due to the higher rates of engagement. This can work for any niche imaginable, from individual physical product sales to information products, to coaching and many more.
About Facebook Groups
Facebook groups are communities within Facebook. Each group is based around a specific cause, special interest, or niche. Groups can be created or sponsored by a business, organizations, or the individual.
There are also several types of groups, such as open, closed, and secret. Each kind of group has a different level of privacy.
If your business offers training and information about marketing for businesses in your area, you can start a group for a specific location such as a region, county, city or town.
Groups are one of the powerful ways to engage your audience, and help you create raving fans that will help you promote your products and services. If you’re following these steps you will to start getting more prospects and sales from Facebook Groups.
You’ll be glad you did because this powerful method transforms your business and boosts engagement in amazing ways.
Define Your Group Niche
If you’ve already identified an ideal group or your target audience, this part will be easy. If you aren’t sure who your target audience is and what sort of problems they have, you’ll need to make sure you do that first.
- Example: you sell Cat Toys
A general cat lover’s group is a great example. First, name the group something that makes it simple and easy for your audience to recognize the group for its purpose. You might call it Cat Lovers Unite.
- Example: you sell E-Book Cover Designs
A group focused on authors who want easily to make cover designs is another good idea. You may call it something like E-Cover Design Tips for Authors.
- Example: you sell Work From Home Courses for Moms
A group made for moms wanting to work from home will love having a group tailored for them that they can trust for providing good information. You can call it Moms Who Want to Work from Home.
You’ll obviously want to make the group stand out so try to make the name unique and related to your brand or website name. Once you choose the right name and what the focus of the group is, you can start building your Facebook group membership.
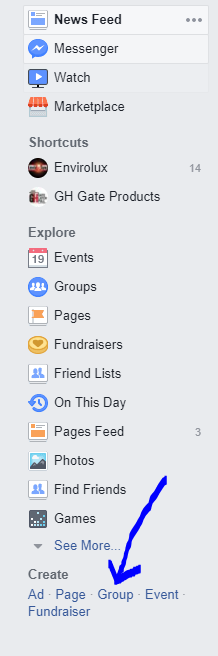
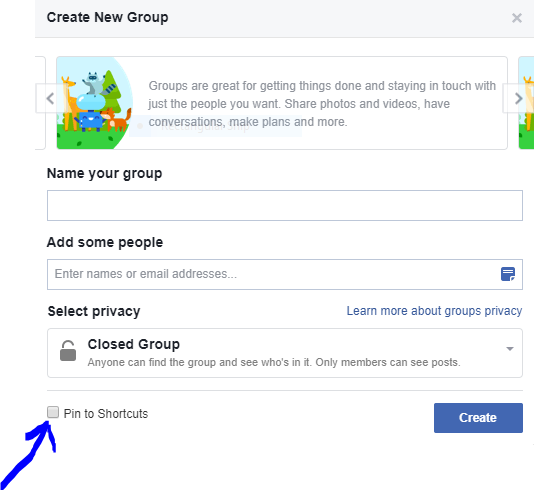
When you create your new group, you’ll be prompted to add at least one person to the group to get started, so go ahead and add a good friend or reliable person for now.
The most effective groups are moderated well by you or your admins, and are closed. Once the group is created, choose an appropriate icon from their choices that can represent your group.
Create a Page for Your Group
 You don’t market in a Facebook Group the same way would on a Page. There is a difference! On Facebook a Page is a Business listing/storefront and a Group is a private collection of people who share an interest or are members of a club.
In addition to a Facebook Group you should also create a Business Page for your group, so you can link the two to each other. Match the branding of course, and connect the two.
Remember Groups, Pages and Profiles are different. Profiles are for individual people, Pages are for businesses and Groups are for interests and can be personal or business.
The last thing you’ll want to do is to confuse people, so the Group and the Page should each have covers that clearly set them apart. For example, you can add text reading “Group” on the Group cover and have a very obvious link to the group on your Page.
Having a page specifically for the group lets you access many features and promote in more ways. After creating your page, you’ll use it to post info about the group, adding teasers and other information to encourage your Facebook audience to join your mailing list and your group.
- Create a Profile Fill out all the information you can, especially the “about” information so that you can fully describe your community. Also, put your page in the right categories so that your page is easily accessible people, then through the page they can find the group. Make sure everything matches the Facebook Group info as closely as possible. Be sure to click the “pin to shortcuts” to make sure it’s easy to find on your Facebook menu.
- Create a Post After the page is made, create an introduction post. Ensure that your post shows a link to your Facebook Group, everything should be very connected. Add a nice picture that gets people’s interest/attention and pin this post to the top of your page.
- Create a Second Post Start using the Page to post advice/tips and general information that appeals to your audience. You can do live Facebook events and then use these events and posts for it within your ad manager to promote the group and your page.
After you’ve created the associated page for your group, you can now work on growing your Facebook group to get more sales and prospects. The page and the group work together at least for now, there is a chance that Facebook will eventually allow marketing of a group, however, right now, you need a page to help you market your group because you are not allowed run ads on Groups, but you can on Pages.
Brand Your Facebook Group
Once you’ve created your Facebook Group, it’s time to brand it. You want the branding on your website to match your group’s branding, this will make it more recognizable.
Create a cover for the group, then and add a good headshot for the profile picture, as this will make yourself apart of the brand. People respond much better to groups when they can see your face and know there’s a legitimate person behind it.
Your business logo can go into the cover design instead.
- Group Description – Users will see the group’s description first, this will help them decide if the group is for them. If your group is private, this is especially important because they’re basing whether or not they want to join on this info. Focus on the benefits of your group, what it can do for them, rather than on what they can buy from you and how you profit.
Example: Moms Who Want to Work from Home
Description: Amazing tips to earn money at home and not miss out on raising your own kids
Group Cover – This cover or banner is a great opportunity to ensure that your audience will see the information needed to connect with you, outside of the group. Ensure that your cover matches your website’s branding. Include contact information, social media and images that show your expertise.
- Profile Picture – Choose a picture of yourself for best results, most people are more trusting of a person than they are of a brand or corporation. Showing your picture will humanize the group experience, making it more personal and intimate.
- Tags – You can also add tags to the group so add tags that are keywords that represent your group. Examples for the work at home mom group tags might be: work at home mom, work at home training, earn money from home, moms who stay home and so forth. Use as many tags as it lets you that are relevant to who you want to join the group.
- Group Type – When you pick a group type, make sure it matches what you’re doing. You can choose custom group type and pick the features you want in your group. In addition, you can also target a specific location if you want to.
- Questions – You are allowed to ask up to three questions of anyone who wishes to join the group. This is a perfect way to weed out possible spammers who can clutter groups. It is better to screen people at the signup stage rather than letting just anyone join the group. This makes it more meaningful, targeted, and beneficial to the members.
- Pinned Welcome Post – In your group, you can create a post with rules for the group that you can pin to the top of the page. This way everyone will see that post immediately upon joining the group.
Setting up a group by following the sets and prompts in Facebook isn’t hard. Don’t over think anything but think about what your audience wants and what would be efficient for them as you do this. Your audience is always first and foremost if you do truly want to engage with them and help them.
Direct Ways to Boost Conversions with Facebook Groups
- Utilize Pinned Posts – Each time members go to the group, a pinned post will show up at the top, this is a great place to highlight and link to your sales pages, opt-in offers, resources, and other valuable items.
- Welcome New Group Members – When a new member joins, always interact and welcome them, making it personal. Then, direct them to your opt-in offers, after all you want to get them on your list. This is the ultimate goal and can be done by offering a unique freebie, specifically for group members. This shows that the group is beneficial to users.
- Upload Helpful Files – Every group has an area where you can upload files. Examples might include a list of tools and resources, freebies, your opt-in, an editable members list, group rules, and anything else that you believe can add value to the group.
- Link to a Group Calendar – Another great thing to put in your welcome messages or pinned post, and in the files, is a link to a calendar. Google Calendar is useful because you can share any upcoming events all in one place.
- Cross Promote – If you have other online real estate (maybe a shop on CafePress) be sure to cross-promote those using the files, welcome messages, and new posts.
- Share Blog Post – Every time you write a new blog post, share it within your group and invite them to go to the blog and make a comment on it.
- Ask Members to Promote – A great way to build a membership is to have a membership drive. Host a contest every so often where your current members invite their friends to the group and the winner can get some kind of freebie.
- Host Private Group Live Events – Rather than on your public page, you can host a Facebook live event within your group. This gives private group members some special insider treatment and information that others can’t get.
- Ask Questions & Post Short Answers – You can use a customer question, use a group member’s question, or make your own question to pose the group. Give feedback while also answering the question with a short answer liking to a longer answer as a blog post or in the form of an information product that you should link to within your answer.
- Let Your Members Promote – Schedule a specific time when members can share resources or promote their businesses or a offer. This will enable members to get subscribers and buyers on their own.
- Add Videos – People love videos, so if you create any for your other platforms you should also upload them to your Facebook Group. You can also make super short tutorial videos teaching your members about your topic. For example, don’t assume they know how to find where the files section is in the group, post a short video to show them how they can find them.
- Offer a FB Group Member-Only Upgrade & Coupon – Membership has its privileges so make them feel like VIPs. Give special offers that will only be shown to these members. They will feel special and they will reciprocate by bragging about the group.
- Share Your Progress – If you’re planning an event, creating a new product, or doing something that will eventually be offered to the group, tease them by letting them in on what’s coming, giving them an opportunity to find out first by getting on the list.
- Ask for Feedback – As you create new products, use the group to get into their heads. The audience will feel as if you read their minds. Ask their opinion on titles of programs, cover images, even group rules. The more you make them feel apart of something the more loyal and engaged they’ll become.
- Share Tips & Encourage Opt-ins/Buys – If you have a tip to share related to something members care about, do it. The more resources and valuable assistance you offer, the more likely they are to opt-in and buy what you offer.
- Share Quote Images – A good way to boost your content is to create memes or jokes with quotes relating to your freebie, services, or products. They can be quotes from inside the product, testimonials, or from celebrities related to your niche.
- Create Customized Headers – Every group has a custom header, this can do double duty by welcoming everyone, but it can also be a billboard for your promotions, email options, and current offers. Add your email opt-in or advertise a freebie to your custom cover.
- Use 3rd Party Automation – When possible, use third-party automation to help you add group messages, making your voice more consistent. Depending on what you’re promoting, you may use something like Hootsuite, or E-Clincher which allows you to schedule posts on multiple social platforms. If you have a WordPress site, there are free plug ins that will help you schedule your posts. Other software can help you promote items from related shops, such as shopify or etsy.
- Plan Community Events – As a Facebook group leader, you have the opportunity to plan both online and offline events. These are great chances to get to know each other better and to boost profits.
These tips offer you the means to directly influence your audience in a Facebook group to convert into a listed member, promote your website or group, and buy more products or services because you can offer them so much value.
Grow Your Facebook Group
You have quite a few option when it comes to growing your Facebook Group, however, depending on your niche and the purpose of your group, some methods may produce better results than others. Let’s look at a few strategies that will work well for most groups.
- Post Updates Often – Post updates to your page and your group often. You can schedule posts to appear on your Page in advance. Short tips, polls, cute pictures, polls and so forth (if relating to your target audience) will all work to help grow the page.
- Run an Ad to Get More Views – Facebook allows you to run ads on a Facebook Page. You can run all kinds of ads to get more likes, you can also use the ad manager to promote or boost one of your posts/videos inviting people to your group. It might be a good idea to seek help from a professional FB advertising expert to set you up and optimize correctly.
- Cross Promote Across Channels – If you already have an email list make sure to invite them to your page and group. In addition, use the email list to create a look-a-like ad set on your Page so that it will bring them to your page. Once you get a few hundred likes on your page, you can use the likes in a look-a-like advertisement as well.
- Share Blog Posts – Anytime you write a blog post you should be sharing it. Write a post on your blog about your new Page and Group then share it to your Facebook, Twitter, Pinterest, Instagram, LinkedIn and any other social media that you’re using. The more people you tell about your group, the more people will start to join.
- Other Groups – When given the ability, tell people in other groups about your group. Some group owners don’t like when others market for their group in others, so be sure to read the rules first so that you don’t get banned from the group, or even ask permission. Even if you can’t promote within a group, if you participate in the group your group will start showing up to the members of the other group by association. They’ll join your group just because they see you are helpful.
- Ask Members to Promote Your Group – Ask members as they join to tell other people about your group. Use this to your advantage by telling members to add their friends. Give you members a good reason to promote the group, and the tools to do so. Provide quality newsworthy info for them to share or valuable deals to repost on their pages.
- Approach Influencers – Influencers are great resource that could provide some specialized, topic related information to your members. Identify and ask a targeted influencer in your niche to join the group. Group members might have friends that would be interested or are an expert in a related topic; get them to invite those friends to join the group.
Once your group has expanded to about 500 members you’ll notice that membership starts to grow almost effortlessly. If you have been engaging with your members since day one, and continue to do so daily, you will have a group of people who will want to be first to buy the things you recommend.
Convert Group Members into Prospects & Buyers
After building the group, it’s time to become super successful. Monetize it so that you convert more prospects into customers. In order to gain trust the engagement level in your group is absolutely priceless.
Remember that groups can become overwhelming and cluttered, so you’ll need to moderate it frequently so you don’t end up with spam advertising their agenda in the group. Keep in mind that if you’re over-promoting, without focusing on resources and information, the value can go down in the eyes of your members.
If you focus on providing value the rest will come as members grow to know, like, and trust you.
- Set Up Moderation – Set up your group so that new posts are moderated, active members or people you trust can act as moderators. Have set guidelines so it’s clear and not based on opinion or personal issues what they choose to act
- Provide Useful Information – The group should provide information that will improve the life of your audience. Plan to schedule posts to your group. Decide on a product promotion schedule, then set up a content marketing calendar for your group using your other content marketing calendar as a guide.
- Conduct Live Events – A live event can be as short as 30 minutes of questions and answers. You can do some public live events on your page and also do VIP live events for group members, but before going live, warn your group before so they have a chance to get there. Then wait a few minutes before you get into the meat of the event so that people will be watching.
Once the recording is posted, go back and edit the thumbnail to be more appealing. Add more info in the text box above the video, including any links you mention.
- Post Questions – A good way to get engagement is to ask the group questions. For example, if you have a mom’s group you might ask for their best Saturday pictures. Even it has nothing to do with what you’re promoting, it will make them feel connected, especially if you also share. If you can link this activity to something related to the group, it will be even better and more beneficial to everyone.
- Provide a “Promote Your Biz Day” – Whether it’s a business or not, give your members at least one day a week to promote what they’re involved in and doing. This will make them feel useful and special. This can help because someone else may have something you can use too.
- Include More Video – Facebook users love videos. Usually they like live video and recorded video. The ability to see your animated face and be able to understand tone of your voice helps them trust you and feel more comfortable.
- Build Your List – Offer content upgrades, freebies, and upgrades to your group that converts them to list members. Then, once you attain the email addresses you can promote to a “look-a-like audience” on your Page to get more members. You can also promote directly other paid products to that list.
Facebook Groups Summary
Running a Facebook Group can be very profitable. A group of just 500 to 1000 targeted/engaged members is enough to earn a living. If you are promoting your products and services, providing useful free information, and cross-promoting to get others onto your email list, you could become a well-known influencer in your niche.
You can start a specialized Facebook Group on any number of topics. The best course of action is to start with one group, build up to a minimum of 500 members, and then repeat the steps for each segment of the audience, so that you can encourage more conversion and more engagement.
Now go get your Groups on!